
Getting the best shot for online websites, blogs, shops, etcetera... all starts with a very SIMPLE studio.
Expensive? No!
Hard to find? Not really!
Confusing? Nope!
What about the camera? Uhh... not now.
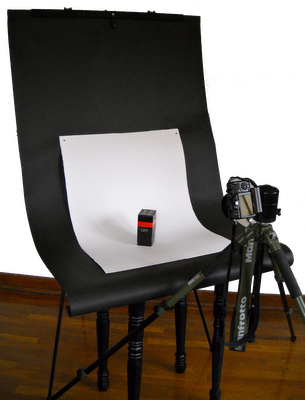
You will need one office style presentation easel (this article uses a clamp style), a large sheet of white, grey, or black paper for a backdrop that is approximately 3' x 6' (grey or black is recommended over white), a sheet of 22" x 30" hot press watercolor paper (hot press has a smooth surface that does not excessively create shading/shadows in the photo like a rough or cold press paper will), four magnets (preferably neodymium, they wont mark the paper like the black ones and they are much stronger for there size), and a table or the floor (whichever space you prefer- there is benefits to working on either surface).
First off, do your best not to kink, krumple, dent, or bend your papers; those sorts of things can create shadows that show up in the photo.

The watercolor paper purchased from an art supply shop will cost around three dollars for a twenty-two by thirty inch sheet- and you can buy the generic brand- only be sure it is hot (smooth) press. If you are shooting larger objects (say around ten to fifteen cubic inches) get a larger sheet of paper. This is because it's difficult to shoot without showing the edges of the paper (of course this is only if you care).
Magnets from the hardware store can sometimes be pricy (ehh, about $6), have endless uses. But most importantly, four of them hold up the WC paper on the backdrop paper. It is important not to permanently attach the WC paper to the backdrop paper. Depending on the item being photographed, either a vertical or horizontal piece, you will shift the WC paper up or down- shooting from the side or more above the object. As for the backdrop, it helps to glue a stiff strip of board to the top edge to help the easel grasp it. This may vary on what style of easel that you have. You can also fold it over several times, just be sure to buy a sheet of paper about a foot longer to compensate for the loss.
As for the easel, picked this one up from a thrift store for about three bucks, oddly and quite by surprise, if you buy it new from the office supply store, the price is quite hefty. This setup will get you going, but remember photo editing software can do a lot, and even the best studio, with the best setup, will still use it. The pictures below are some crayons I photographed with this studio setup, they are for a encaustic monoprint post, Crayons in the Realm of Encaustic- photo on the right, before photoshop (PSElements) and the photo-shopped (PNG) version on the left.


Have a
Happy Shoot!!! :)
No comments:
Post a Comment