Search Blog Articles

Tuesday, November 29, 2011

BACK TO


Crayons, known for having produced many stick figures, showing alternatives to simple batik processes, used to push up ones nose, rudimentary in wax monoprinting, and along with who knows how many other enjoyable activities- 'cept maybe not the nose thing.

The term crayon is inclusive, synonymous with certain memories and products. Not always on the top list for artist materials, or at least professional artist ones. Sometimes even condemned to be, "childish," as if, "childish," is a bad thing. Having my own reservations about them, I still feel they've earned a right, even if it were out of just plain nostalgia. It is however, for more than just nostalgia's sake.

Something that springs to mind is that I have been using them for teaching encaustic monoprinting. Rarely ever do we use expensive high-end art supplies to learn a new art form or process, at least not if it isn't necessary, and of course, not in saying to cheap'n the value of the crayon. Here is a look at how crayons are useful different ways.

First off, it is to make full use of that nostalgia value. Nothing like digging through a bucket crayons, or breathing in that familiar scent, to get the memory juices flowing. If not used for what they were meant, they can be found in advertising, sculptures, mailboxes, collections, and much more than one can think of. Where have you seen crayons outside of typical coloring? Images of the crayon are everywhere, just look at the header of this post. Nostalgia plays a big role and is important- whether we realize it or not.

Monoprinting
Second, and keeping it short with links to previous posts written on the topic, a process making use of the everyday run-of-the-mill crayon. Combining encaustic and printmaking, wax monoprinting or monotypes, in general is a printmaking technique that creates individual unique pieces with the process applied to encaustic. The process is very simple and crayons make the perfect learning tool. Being relatively inexpensive compared to encaustic paint, but ready to use out of the box, plentiful supply of colors, and found in many stores just around the corner- it's hard to argue the case for not using them. Monoprinting with crayons can be a fun and easy first step to learning a new technique, one tied to a ancient practice. Only remember if you plan on creating gallery worthy work, or honestly any minute amount of seriousness, you may (or may not) move on to encaustic wax. I will not mention the health issues, or the ramifications of using crayons as encaustic here, rather for in depth look on encaustic, refer to the Encaustic Resources link.

Batik dyeing
Crayons can be used in a simplified batik process or in candle-making as well. Crayons argumentatively will always have a place and serve the purpose of many lessons in art making- WOW! if only only I had my own crayon making mill and label machine I could make my own, with my own choice of ingredients.

Thanks for reading and don't forget to look at, Crayons in the Realm of Encaustic, if you would like to read more technical stuff or about encaustic itself, look at the Encaustic Resources.

Monday, November 21, 2011

A simple photo studio for websites, blogs, shops, etc.


Getting the best shot for online websites, blogs, shops, etcetera... all starts with a very SIMPLE studio.

Expensive? No!
Hard to find? Not really!
Confusing? Nope!
What about the camera? Uhh... not now.

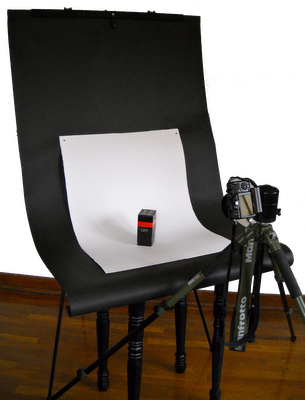
You will need one office style presentation easel (this article uses a clamp style), a large sheet of white, grey, or black paper for a backdrop that is approximately 3' x 6' (grey or black is recommended over white), a sheet of 22" x 30" hot press watercolor paper (hot press has a smooth surface that does not excessively create shading/shadows in the photo like a rough or cold press paper will), four magnets (preferably neodymium, they wont mark the paper like the black ones and they are much stronger for there size), and a table or the floor (whichever space you prefer- there is benefits to working on either surface).

First off, do your best not to kink, krumple, dent, or bend your papers; those sorts of things can create shadows that show up in the photo.

As seen here in this post's pics, you get a good idea how to set-up. Rather simple, and most supplies outside of the camera equipment, were found at a thrift store, or were inexpensive supplies from the hardware and artist supply shop.

The watercolor paper purchased from an art supply shop will cost around three dollars for a twenty-two by thirty inch sheet- and you can buy the generic brand- only be sure it is hot (smooth) press. If you are shooting larger objects (say around ten to fifteen cubic inches) get a larger sheet of paper. This is because it's difficult to shoot without showing the edges of the paper (of course this is only if you care).

Magnets from the hardware store can sometimes be pricy (ehh, about $6), have endless uses. But most importantly, four of them hold up the WC paper on the backdrop paper. It is important not to permanently attach the WC paper to the backdrop paper. Depending on the item being photographed, either a vertical or horizontal piece, you will shift the WC paper up or down- shooting from the side or more above the object. As for the backdrop, it helps to glue a stiff strip of board to the top edge to help the easel grasp it. This may vary on what style of easel that you have. You can also fold it over several times, just be sure to buy a sheet of paper about a foot longer to compensate for the loss.

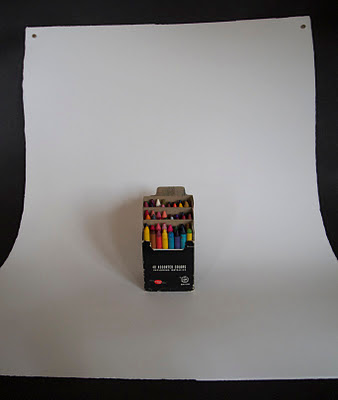
As for the easel, picked this one up from a thrift store for about three bucks, oddly and quite by surprise, if you buy it new from the office supply store, the price is quite hefty. This setup will get you going, but remember photo editing software can do a lot, and even the best studio, with the best setup, will still use it. The pictures below are some crayons I photographed with this studio setup, they are for a encaustic monoprint post, Crayons in the Realm of Encaustic- photo on the right, before photoshop (PSElements) and the photo-shopped (PNG) version on the left.

Some simple tips (I won't give lengthy descriptions), play with these in photoshop: 'levels,' 'colorcurves,' 'saturation,' 'brightness/contrast,' and as seen in this posts pics, 'PNG,' files allow for backgrounds to be cropped out with the, 'magic wand tool,' (play and tweak the tolerance for best results- tolerance controls how many pixels are selected) and the result is a transparent background to match website background, or in my opinion, simply to get rid of that annoying blocky feel.


Have a
Happy Shoot!!! :)

Monday, November 14, 2011

Art Materials (Japanese Pull Style Saws)

As an artist and a woodworker I've always found a Japanese pull style saw to be one of the most beneficial tools to have around the workshop or studio.

A saw designed on a pull stroke instead of the western design to push in order to cut- it is used where accuracy and control are key to great craftsmanship. The pull design allows for a very fine kerf (the width of a cut) than it's push alternative that has a thicker blade that resists bending or kinking when pushed.

Additionally a blade can be purchased, less strain on the wallet when it comes to replacement, and why buy a handle if you dont need to. Any downsides to the design may be how easy it is to knock of a tooth or two if and when care is not taken. All in all, far worth the cost and recommended over the alternative for those looking for a great saw. 

Thursday, November 10, 2011

Peek at a Current Project

Kasha Katuwe
Soon I will add encaustic wax to this stack of board and wood (along with another section not shown) to recreate a place, Kasha Katuwe, Tent Rocks National Monument. All part of works I am doing on the topic of land.
  • Excerpt from Portfolio - Current project concepts surround the topic of land and how it is built upon, utilized, and restructured to suite the needs and wants of the public pursuant of preservation and restoration with a requisite of use.


Wednesday, October 19, 2011

New Look & Features!


ParksArtworks© has been and will be going through some changes in the way it looks, and in the way you navigate. Things have been streamlined and made more efficient in order to bring a better online experience.

There are two main pages: The Blog and the Encaustic Resources.

Don't forget you can connect with us on Facebook and Twitter- whatever might be your favorite way to stay connected.

If there are any concerns, question, suggestions, or comments- which are very much appreciated, do not hesitate to contact us.

Thank you

Sincerely,
ParksArtworks©

Thursday, September 22, 2011

Encaustic: What's Next?

I started working with encaustic a decade ago, drawn to it's sculptural qualities as a painting medium. (Image- one of the first encaustic painting that I had ever painted: Untitled 10" x 10" 2002.)  I set up the Encaustic Resource Pages to provide basic to advanced tutorials and information, plus supplemental info., such as where to purchase supplies. Now... the next step is up for suggestion.

Beyond the information out there that wasn't out there just a few years ago, the more recent information, personal blogs, websites, YouTube videos, instructional DVDs- all rely mostly in suggestions and personal technique. I myself suggest using one tool over another, say one is better suited. I can give you information on temperatures, substrates, brands, or safety precautions. And, I have given much of this, this kind/sort/type of information on those resource pages. However, I would like to offer more, but it is clear to me that this is quite difficult to do or to decide upon not knowing the express needs of the individual. I could further the site with more photographs or videos of step by step visual instruction on a topic. As visual artists there is no harm in offering more visual aids. Knowing, sometimes it is easier to see how, than to be told how.

So what is next for my Encaustic Resource Pages, particularly Tools and Techniques in encaustic (outside of video/image tutorials), is there something drastically missing? Is there something you are looking for that isn't there? Perhaps a full fledged website would be nice (no money for that right). Better navigation never hurts. A collection of works from artist who use wax or encaustic as a medium would be cool. This is all open to suggestion- even if you don't work in encaustic.

Personally I will be trying to keep up by posting news on what I am personally doing art wise, including encaustic- primarily in a sculptural realm. So stay tuned, comment, ask question, and/or wait.

As always, thank you for reading,
Jonathan 

Friday, September 16, 2011

Current Work Continues: Installation?

Lately I seem to get stuck with the idea of: Should I or should I not make what I am working on an installation? I have not come to all the ideas of what it clearly is- therefor it is difficult to say that I want to take that route. Anyway, here is another glimpse, an addition to the project I posted previously- a display cabinet, adding to the fourteen foot long piece of meandering wood and encaustic sculpture. I hope to add more encaustic 'parts' or 'pieces' to the whole thing at a later date- so I will continue.

Sunday, August 28, 2011

Current Encaustic Project

Path | 1 x 168 in.
A glimpse of my current piece, encaustic and wood. This project is intended as sort of an installation, titled, "path," it is one of several in a series of pieces on the topic of land. It is building on the idea of the trail, a confined pathway that is natural and unnatural. The piece is intended to cut through a space much like a pathway or trail cuts through , meandering, conforming to it's environment. The piece is to be suspended and pictured here as a work in progress, temporarily installed in the artist studio floor.

Saturday, August 27, 2011

Current Happening

Recently I had the pleasure of designing this ad... as well as photographing the art- which was used in the header design, within the ad, and on Ghost Ranch's website.

FROM THE AD
Opening Reception: Saturday August 27, 2011, 2-4 pm
@ Ghost Ranch Piedra Lumbre Education and Visitor Center

The Illusion of Colors, featuring a variety of bright energetic colors as creative expressions by artists who participate in the VSA Day Arts Program at North Fourth Art Center. In their varied and artistic ways, the artists interpret and celebrate different hues and ranges of color in the art of quilt making, unique ceramics and mixed media painting. Color has a great effect on us all, both emotionally and physically, and the artworks presented encourage interaction and discussion.

"We believe that art is to be shared, to be given and received with appreciation, respect and awareness. The red and yellow cliffs of Piedra Lumbre makes a magnificent backdrop for our artists' colorful work," said Lina Jabra, Community Development Director.

The goal of the exhibit is to highlight the artistic achievements of individuals with disabilities and provide opportunities to exhibit and sell their artwork statewide. Currently a portion of the sale of each work goes to support the Ghost Ranch Piedra Lumbre Education programs with the remaining portion going directly to the VSA artists.
________________________________________________________________________________

The visitor center is located on US Highway 84 between mile marker 225 & 226, just north of the main Ghost Ranch entrance. For more information and hours of operation
please call (505) 685-4312 or visit www.ghostranch.org.

Monday, June 27, 2011

REMINDER: Allyson Packer

REMINDER of upcoming exhibit.
Allyson Packer; fellow artist and friend, is having an upcoming exhibition of her work in Albuquerque, NM at the Harwood Art Center; I wanted to take a moment and offer her my support.

Allyson Packer works in a variety of media, taking subject matter from her own life and using it to examine the human need to seek out structure and understand our place within it. She received her BFA from the University of North Carolina, Chapel Hill and has shown nationally in Maryland, Minnesota, and New Mexico. She was the recipient of the Harwood Art Center's 2010 Crissey Emerging Artist Fellowship and has been named a 2011 fellow at the McColl Center for Visual Art in Charlotte, NC.

Her upcoming exhibition, "As Much as I Can Carry: Personal Plans for Survival," the artist creates installations reflecting on her experiences surrounding time she spent living in New Mexico. Using the theme of survivalism in the desert, her artwork tells the story of an individual searching for meaning in a desolate environment. Serving as a site for the projection of an internal conflict, the desert reveals both the conscious desire for autonomy and subconscious desire for comfort and inclusion.

You can find out more about Allyson and her work at these websites, http://allysonpacker.com/ and http://www.youtube.com/user/allypak.

So if you are in ABQ, go see Allyson's show, Opening Friday, July 1, 2011 6pm-8pm.

As Much as I Can Carry: Personal Plans for Survival
At the Harwood Art Center main gallery
1114 7th Street NW
Albuquerque, NM 87102
(505) 242-6367

Thank you for reading,
Jonathan

P.S. Thanks A.P., for the info :)


Related Posts with Thumbnails